

Tutorial: Space Wolves bemalen/ How to Paint Space Wolves 1
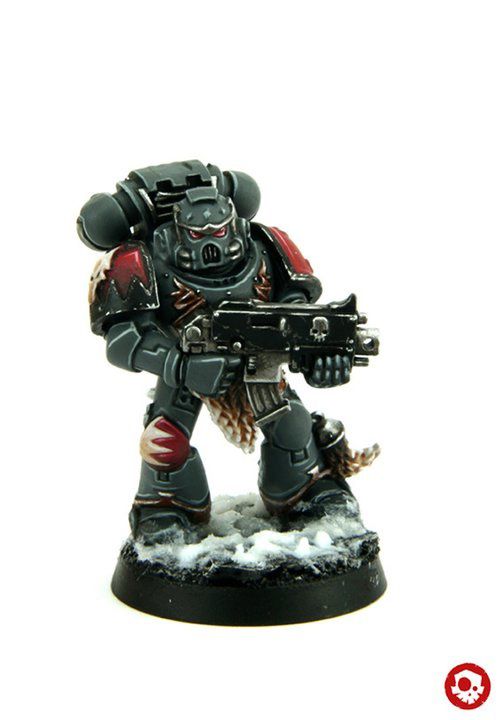
Hallo, das ist mein erstes Tutorial: Wie bemale ich Space Wolves? Ich zeige euch hier schritt für schritt, wie ich eine Graumähne bemale.
Hi, this is my first tutorial: How to paint Space Wolves. I will explain step by step, how I paint a Gray Hunter.
Alle Farben die ich benutze sind von Games Workshop.
All paints are from Games Workshop.
Chaos Black, Skull White, Blood Red, Hawk Turquoise, Scorched Brown, Bestial Brown, Adeptus
Battlegrey, Astronomican Grey, Dheneb Stone, Charadon Granite, Khemri Brown, Mechrite Red,
Devlan Mud, Badab Black, Gryphonne Sepia, Dwarf Bronze (Brazen Brass), Boltgun Metal,
Mithril Silver, (Brown Ink), Gloss Varnish.
Nach dem Zusammenbau stifte ich den Körper und den rechten Arm mit Waffe immer auf ein Stück Kork, so ist es leichter den Space Marine zu bemalen.
After assembling, I do always pin the body and the right arm with weapon on cork. So it's easier to paint a Space Marine.
1. GRUNDIERUNG / UNDERCOAT
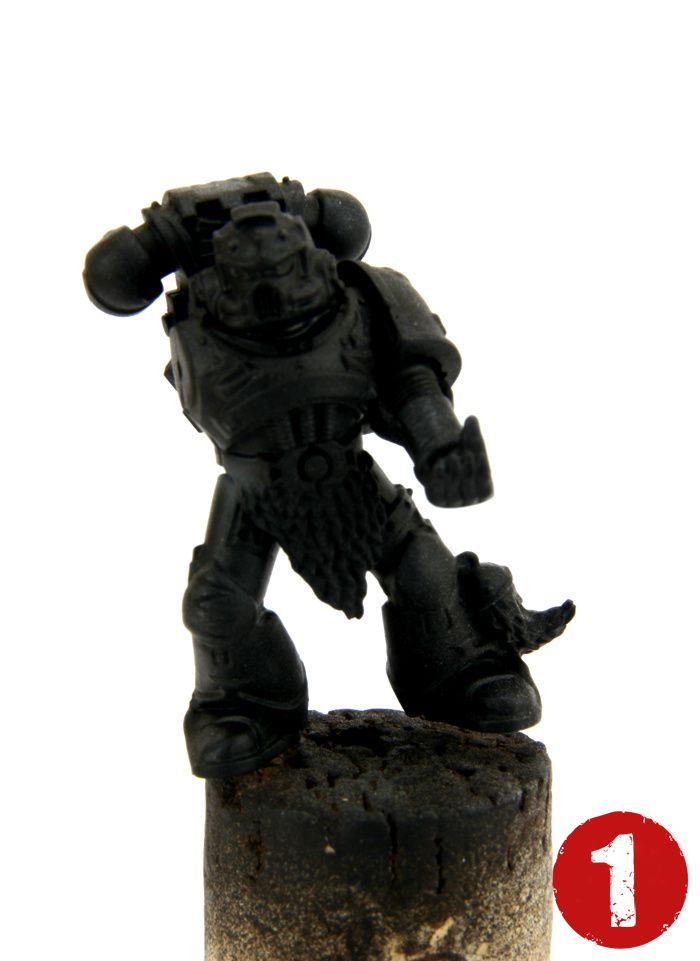

1 - Gundiere das Modell mit Chaos Black Spray von Games Workshop.
Undercoat the model using Chaos Black Spray from Games Workshop.
2. RÜSTUNG / ARMOUR

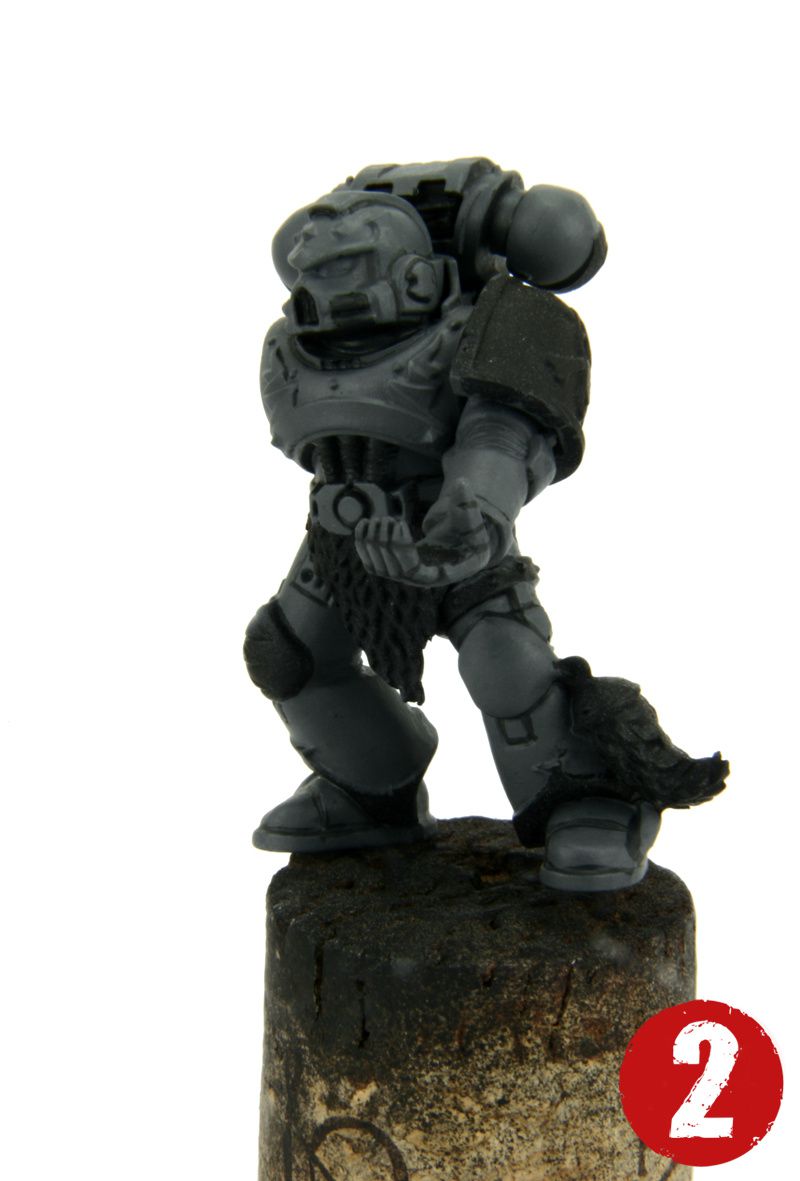
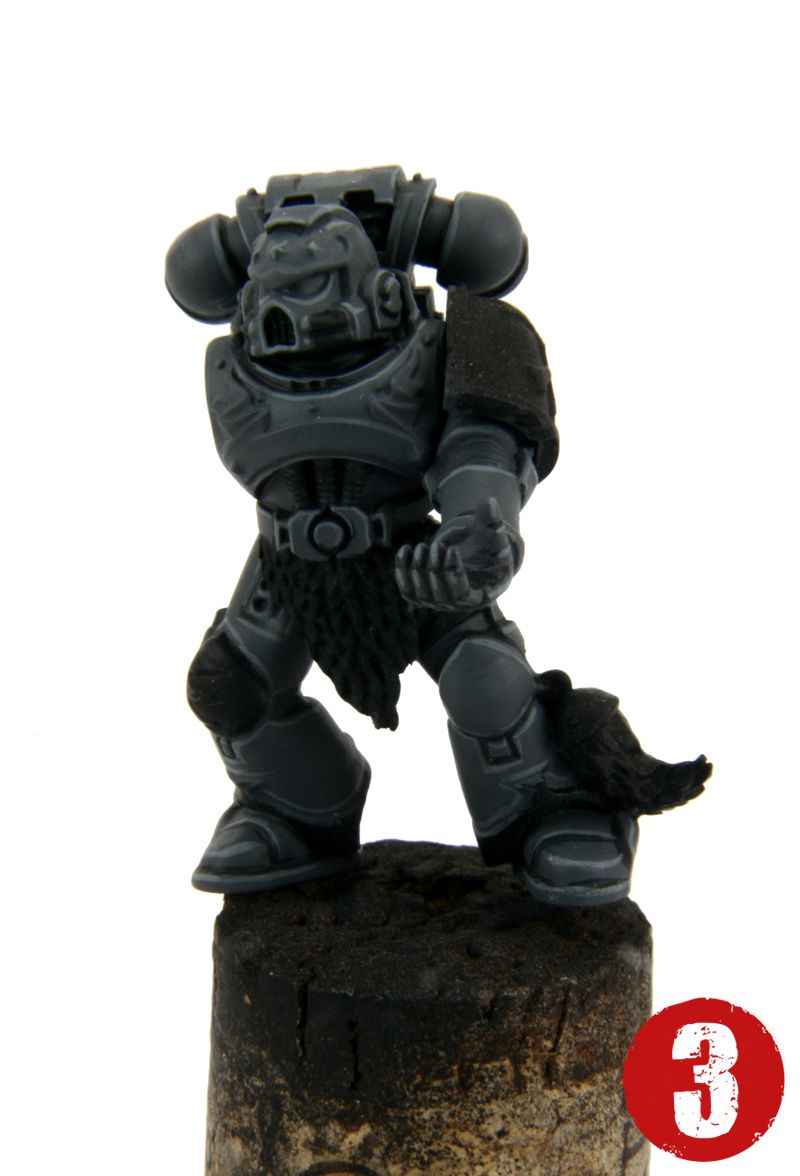

1 - Grundiere die Rüstung mit Adeptus Battlegrey.
Basecoat the armour with Adeptus Battlegrey.
2 - Male die Vertiefungen mit einer Mischung aus Adeptus Battlegrey und Chaos Black (1:1).
Paint a mixture of Adeptus Battlegrey and Chaos Black (1:1) into the armour recesses.
3 - Akzentuiere die Kanten mit einer Mischung aus Adeptus Battlegrey und
Astronomican Grey (1:1).
Highlight the edges of the armour with a mixture of Adeptus Battlegrey and
Astronomican Grey (1:1).
4 - Akzentuiere die Kanten mit Astronomican Grey.
Highlight the edges with Astronomican Grey.
3. WEICHE RÜSTUNG / SOFT ARMOUR


1 - Bemale die erhabenen Stellen der weichen Rüstung mit Astronomican Grey.
Paint the soft armour with Astronomican Grey.
2 - Tusche die weiche Rüstung mit Devlan Mud
und anschließend mit Badab Black.
Wash the soft armour with Devlan Mud and Badab Black.
3 - Akzentuiere die weiche Rüstung mit Astronomican Grey.
Highlight the soft armour with Astronomican Grey.
4. AUGEN / EYES

1 - Grundiere die Augen mit einer Mischung aus Chaos Black und Blood Red (3:1).
Basecoat the eyes with a mixture of Chaos Black and Blood Red (3:1).
2 - Akzentuiere mit einer Mischung aus Chaos Black und Blood Red (3:3).
Highlight with a mixture of Chaos Black and Blood Red (3:3).
3 - Akzentuiere mit einer Mischung aus Chaos Black und Blood Red (3:5).
Highlight with a Chaos Black and Blood Red (3:5).
4 - Gebe zur Chaos Black + Blood Red (3:5) Mischung, Skull White hinzu.
Mix Skull Wihte into the mixture of Chaos Black + Blood Red (3:5).
5 - Gebe mehr Skull White hinzu.
Mix more Skull White in the mixture.
6 - Gebe mehr Weiß hinzu. Male zum Schluss zwei weiße Reflektionspunkte auf die Augenlinsen.
Bemale die Augen mit Gloss Varnish.
Mix more White in the mixture. Finally panit two scores with pure Skull White on the eye lens.
Paint the eyes with Gloss Varnish
5. SCHULTERPANZER INNENFLÄCHE (RECHTS & LINKS), RECHTES KNIE
SHOULDERPAD INSET (RIGHT & LEFT), RIGHT KNEE


1 - Bemale die Schulterpanzer Innenfläche (Rechts & Links) sowie das Rechte Knie mit
Mechrite Red.
Paint the shoulderpad inset (right & left) and the right knee with Mechrite Red.
6. ARMEESYMBOL, TAKTISCHES GRAUMÄHNEN SYMBOL, RECHTES KNIE
SPACE WOLVE CHAPTER SYMBOL, TACTIKAL GREY HUNTER INSIGNIA, RIGHT KNEE

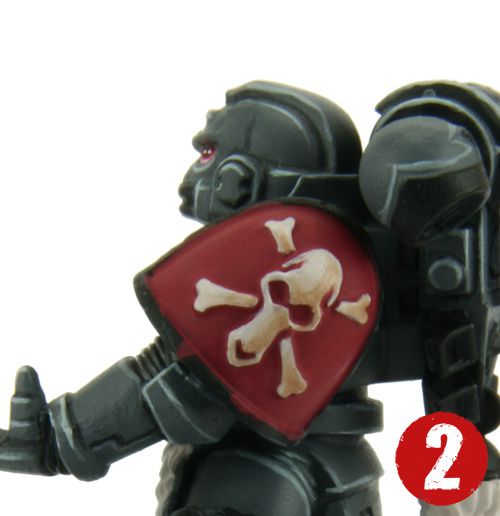
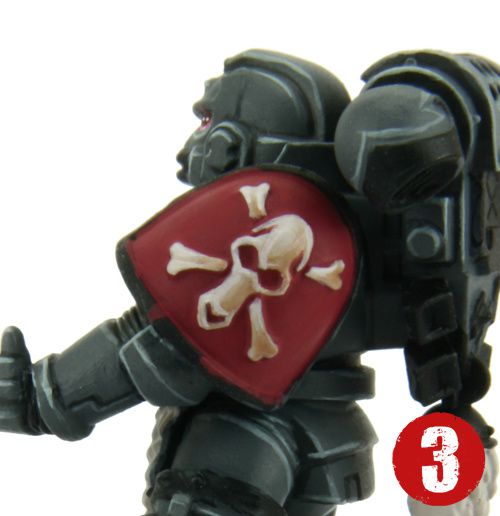


1 - Bemale nun das Armesymbol mit Dheneb Stone.
Paint the Space Wolve Chapter Symbol with Dheneb Stone.
2 - Tusche das Armeesymbol mit Gryphonne Sapia.
Wash the chapter symbol with Gryphonne Sapia.
3 - Akzentuiere das Symbol mit einer Mischung aus Dheneb Stone und Skull White (2:1).
Highlight the chapter symbol wiht a mixture of Dheneb Stone and Skull White (2:1).
4 - Akzentuiere zum Schluß mit Dheneb Stone und Weiß (2:3).
Highlight the chapter symbol with Dheneb Stone ad Whithe (2:3).
8 - Widerhole die Schritte 1 - 4 am taktischen Graumähnen Symbol und der Truppmarkiereng
(Rechts Knie).
Repeat the steps 1 - 4 with the tactical Grey Hunter insignia and squad indentation on the
right knee.
7. SCHULTERPANZER INNENFLÄCHE (RECHTS & LINKS), RECHTES KNIE
SHOULDERPAD INSET (RIGHT & LEFT), RIGHT KNEE


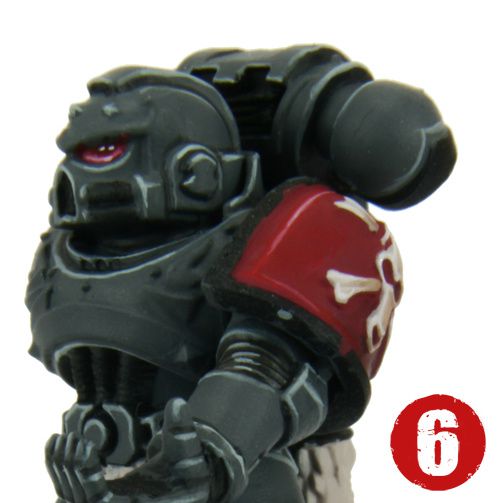
1 - Das fertige Armeesymbol auf der Innenfläche des Schulterpanzers.
The finished chapter symbol on the left shoulder inset.
2 - Tusche mit Devlan Mud die Fläche die im Schatten liegt.
Wash with Devlan Mud the shadow areas.
3 - Tusche nun mit Badab Black.
Wash with Badab Black.
4 - Akzentuiere mit Blood Red.
Highlight with Blood Red.
5 - Akzentuiere mit einer Mischung aus Blood Red und Skull White (1:1).
Highlight with a mixture of Blood Red and Skull White (1:1).
6 - Gebe zu der Mischung mehr Weiß hinzu (Blood Red und Skull White 1:2)
Highlight with more Skull White (Blood Red and Skull White 1:2).
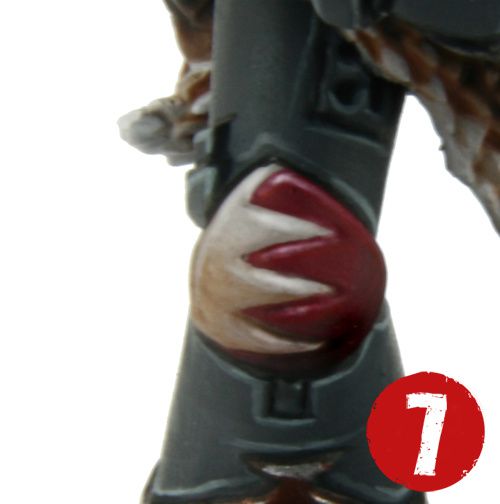
7+8 - Wiederhole die Schritte 1- 6 mit jeder roten Fläche (rechtes Schulterpanzer
und rechtes Knie mit Truppmarkierung).
Repeat the steps 1- 6 with every red area (right shoulderpad inset and
right knee)
8. WOLFSPELZE / WOLF PELTS


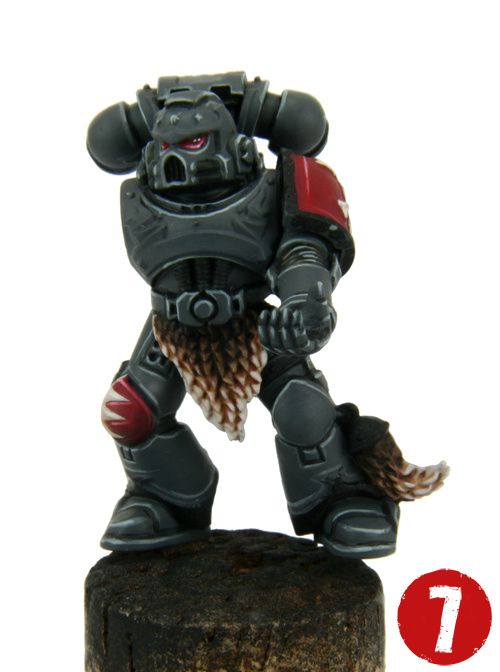

1 - Bemale alle Wolfspelze mit Dheneb Stone.
Layer all wolf pelts with Dheneb Stone.
2 - Tusche nun mit Gryphonne Sapia.
Wash with Gryphonne Sapia.
3 - Tusche mit Devlan Mud,
Wash with Devlan Mud
4 - Tusche mit Wasser verdünnten Scorched Brown und Chaos Black (1:1)
Wash a watered-down mixture of Scorched Brown and Chaos Black (1:1)
5 - Tusche mit Chaos Black
Wash a watered-down mixture of Chaos Black
6 - Bemale die Spitzen mit Dheneb Stone
Layer the top level of the coat with Dheneb Stone
7 - Akzentuiere mit einer Mischung aus Dheneb Stone und Skull White (1:1)
Highlight with a mixtue of Dheneb Stone and Skull White (1:1)
8 - Akzentuiere mit einer Mischung aus Dheneb Stone und Skull White (1:2)
Highlight with a mixture of Dheneb Stone and Skull White (1:2)
9. METAL (BOLTER, RÜCKENMODUL, HELM GRILL USW)
METAL (BOLTER, BACKPACK, FACE GRILL...)


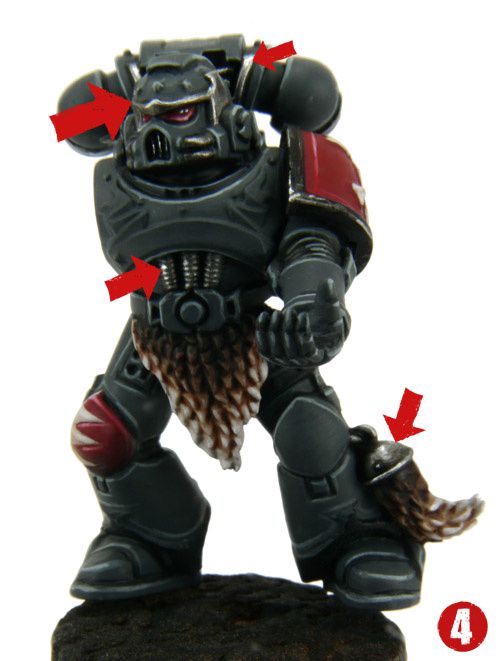

1 - Bemale die Metalflächen mit Boltgun Metal
Layer the metal area with Boltgun Metal
2 - Tusche nun alles mit Badab Black
Wash with Badab Black
3 - Akzentuiere mit Mithril Silver
Highlight with Mithril Silver
4 - Wiederhole Schritt 1 - 3 mit allen Metalflächen
Repeat step 1 -3 with all metal areas
10. KAMPFSPUREN (SCHULTERPANZER AUSSEN, BOLTER)
BATTLEDAMGES (SHOULDERPAD TRIM, BOLTER)

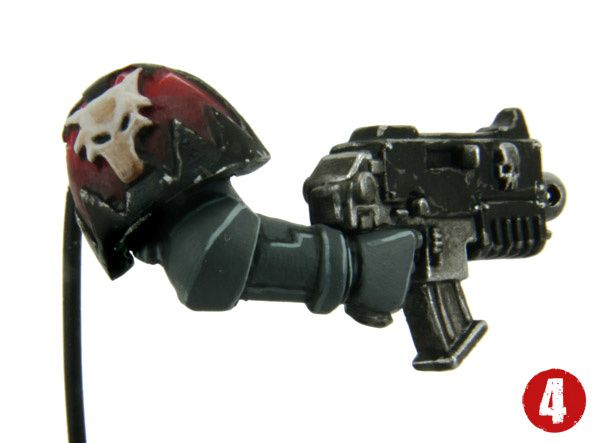
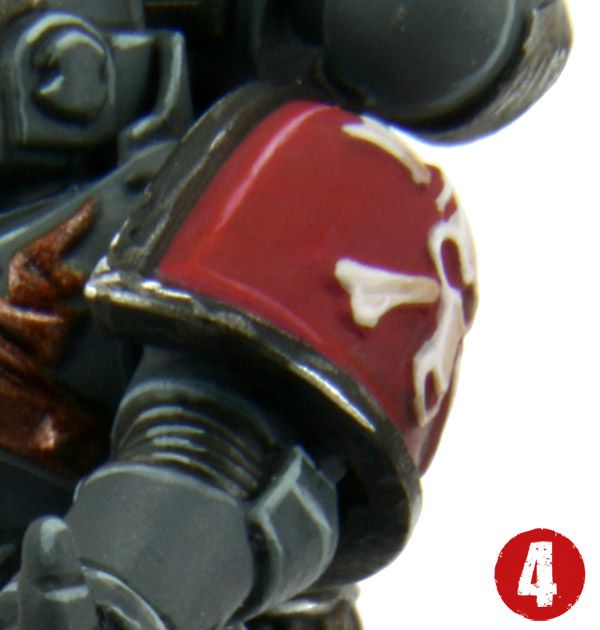
1 - Male mit Boltgun Metal ein paar Kratzer auf das Boltergehäuse
Layer with Boltgun Metal some scratchs on the Bolter Casing
2 - Tusche die Kratzer mit Badab Black
Wash the scratchs with Badab Black
3 - Akzentuiere die Kratzer mit Mithril Silver
Highlight the scratchs with Mithril Silver
4 - Wiederhole die Schritte 1- 3 die Kampfspuren haben sollen
Repeat the steps 1 - 3 with all areas with battledamage
11. RÜSTUNGSVERZIERUNG / ARMOUR DECORATION

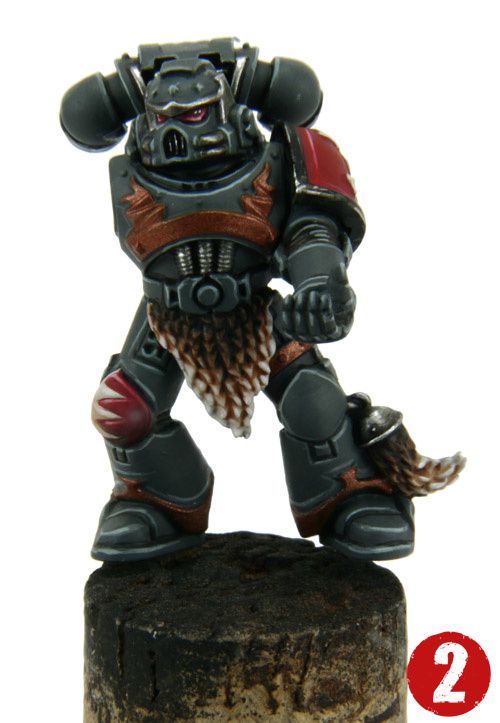


1 - Male die Rüstungsverzierung mit Dwarf Bronze (Brazen Brass)
Layer the armour decoration with Brazen Brass
2 - Akzentuiere mit einer Mischung aus Brazen Brass und Mithril Silver (3:1)
Highlight with a mixture of Brazen Brass and Mithril Silver (3:1)
3 - Akzentuiere mit einer Mischung aus Brazen Brass und Mithril Silver (3:3)
Highlight with a mixture of Brazen Brass and Mithril Silver (3:3)
4 - Tusche die Flächen die im Schatten liegen mit Brown Ink (Devlan Mud)
Wash with Brown Ink into the recesses
5 - Akzentuiere zum Schluß mit Mithril Silver
Highlight with Mithril Silver
UND ZUM SCHLUSS... / AND FINALLY...
Zum Schluss klebe ich den rechten Arm mit Waffe an den Körper und lackiere das Modell mit
Mattlack von Rubens.
Finally glueing the arm with weapon on the body and farnish the whole Grey Hunter with
Rubens Matt Farnish.
Ich hoffe, das war hilfreich für euch. Sollte etwas nicht klar gewesen sein, dann schreibt
mir eine Mail. Im zweiten Teil das Tutorials, werde ich auf die Reinheitssiegel, die Runensteine, Gesichter und das Schneebase eingehen.
I hope this tutorial can help you. If you have some questions, just fell free and send me a message. In the second part of the tutorial I will show you, how I paint purityseals, rune stones, faces and snow bases.
Rafael